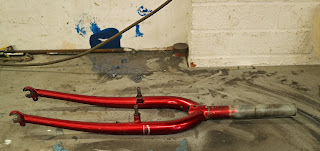
Third time lucky, they say. Bribed with biscuits, Maldon Shot Blasting & Powder Coating https://ctc-powder-coating.co.uk/ kindly slotted in my beloved "ironing board", and the Univega's original forks.
Ironing board??? Well, that's Carl, their shot blaster's affectionate nickname, for my beloved Bob Yak homage. One I reckon's rather fitting. Anyhow, like most of my refurbs, there were a few surprises along the way.
First; the forks. These were chased through with industrial alcohol, to remove any frame preserve. Otherwise (this goes for anything oily, especially OIF motorcycle frames) it will turn molten during the curing phases, ruining the new finish and potentially scalding the sprayer. Not cool.
Graham then whipped them over to the chilled iron grit cabinet. This media, is extremely effective and more durable, than others. However, for flawless results, he gave them a final tidying, using glass bead. Unlike the frame, there wasn't a nickle plated layer, beneath the flamboyant red enamel. https://www.sevendaycyclist.com/after-the-gritters-went-home
Nonetheless, brazing and TIG work was to the stereotypically clean, uniform Taiwanese standard.
By contrast, the trailer was submerged in the methyl chloride tank, for twenty minutes. Much as we'd anticipate, the unsealed 2K factory finish began to lift, and was coming away in grey ribbons. This revealed a phosphate rich primer, which I wasn't expecting, given the budget, yet serviceable top coat.
From here, it went to their main blasting cabinet. One that has echos of Leatherface's cutting room, in Texas Chainsaw Massacre. After performing some remedial surgery on "the pot"; Carl stripped the remaining mulchy mess using cast iron grit. Blasting, regardless of media, provides the lightly dimpled key, for primer and subsequent coats.
This also reveals the item's true structural integrity. I recommend asking your finisher to give you a call, once they've blasted the frame (or other item). At this point, any remedial works (and their cost implications) can be discussed and, where appropriate, commissioned.
So, with the fork given its zinc rich, epoxy primer, I had toyed with the idea of having the trailer's swing arm finished in gloss black and the trailer (sorry, ironing board) chrome silver. However, this would be adding mischief to the mix, for no good reason.
This still received the epoxy base coat, oven cured at 150 degrees, for 15 minutes. The faint tackiness encourages better adhesion, of the colour and clear coats. Chrome silver was then applied, and returned to the curing oven for a further fifteen minutes.
Graham advised me against touching the colour finish, since this requires an acrylic lacquer. Oils from the skin, however slight, can cause oily patches to bleed through.
Curiously, there was no call for lacquering the forks, since the gloss black was described as particularly hardy. Besides a small fracture in the clear coat's surface (caused by a quick release "bite mark") could result in blistering and in turn, unsightly peeling.
Given their attention to detail, and exemplary standards of workmanship, I wasn't remotely surprised (although still delighted) by the impeccable results. Rebuilding took longer than first envisaged. Thankfully I always take photos, of disassembly.
However, I forgot to take my own advice, when it came to two plastic sleeves. These were hidden deep within the swing arm. More by luck than judgement, I managed to reinstate them correctly, first time.
Aside from blowing some Green Oil Eco spray lube https://www.sevendaycyclist.com/green-oil-eco-spray-lube inside the chassis, I applied liberal slatherings of Pure Bike Grease https://www.sevendaycyclist.com/pure-bike-grease to the swing arm's plastic bushing cum bearings, which will hopefully protect and lubricate.
Despite thorough masking, some residual specs of powder can sneak in, thus the hitch assembly required a bit of bedding in, and a shot of Green Oil ECo-Spray lube before they'd connect and release smoothly.
Bob Elliot & Co LTD https://www.bob-elliot.co.uk/ have sent us some lovely Ravemen and Smart lights, so you'll excuse me. Time to pop them on charge, and go out to play.


