Showing posts with label seized components. Show all posts

Sunday 30 May 2021

Lighting, Camera Action


A week down the line and I’m getting better acquainted with the CamPark V40 Action Camera and find it generally intuitive. Forgoing the waterproof housing has addressed the issues with microphone buzz. Video capture is also reasonably good, especially when mounted directly to an aftermarket mount.  


This Minoura VC100 S has been a consistent feature of Ursula’s bars for 8 years. The shock-absorbing cork platform expired last year, substituted with a rubber shim doing something close to nothing in my spares box.  


This overcomes any minor blurring that could strike along washboard tarmac, even with the in-camera stabilisation engaged. Action cameras have relatively small sensors, hence while the image quality is favourable in bright conditions (sun and snow for example) low light performance is less consistent. 


I’ve switched the gasket-sealed weatherproof housing to my fixed gear winter/trainer. Not that I’m pensioning off the Geonaute G-Eye 2 Escape. Though quite elderly and with fewer bells and whistles than we’d expect from a more contemporary model, it’s still reliable and delivering decent footage. I suspect it will become bin fodder once the integrated battery expires, mind.   


Some bar tidying followed, since time allowed. The K-lite Bike packer Pro V2’s switch now nestles beside the lamp and the ORP Smart HornTESTED: ORP SMART HORN (sevendaycyclist.com) in its place. Neater and presented the opportunity to snug down some otherwise easily overlooked fasteners.   


Another batch of DIY corrosion inhibitor has also been brewed. I’d usually make more but this was plentiful for topping up the KA and Micra’s protection. Applying during any damp period will simply seal the moisture IN, which defeats the object. This formula is made using candlewax, solvent and whatever cheap as chips motor oil I have laying around. 


While tending to Ursula’s mudguard hardware, I noticed the Lezyne pump had been “wood peckering” the tubby tourer’s down tube, marking the cream powder coat. After The Gritters Went Home | Seven Day Cyclistso, I polished the blemish out, placed a sticker and a piece of Zefal Skin armor ZEFAL SKIN ARMOR ROLL | cycling-not-racing (sevendaycyclist.com) atop for peace of mind/additional insurance.  While Ursula’s chain might be sporting a slightly scuzzy beard, the SKS Lube Your Chain TESTED: SKS LUBE YOUR CHAIN (sevendaycyclist.com) is a waxy formula that seems to lock contaminant in the outer layer, so it can’t become a ruthlessly effective grinding paste. 


A little goes a very long way, stays put and friction is also comparatively low. If forecasts are accurate, a spell of higher pressure is to hit the UK in the next week, which might present the opportunity for lighter lubes and some serious miles on the Teenage Dream.  Meantime, I’m allowing the Univega to become uncharacteristically filthy in preparation for this bike wash.  

Some people will argue (and I can understand their angle) that these are unnecessary. 


Car wash formulas are cheap as chips, will strip the grot, and leave a protectant barrier behind. I freely admit to being a fan, especially during winter when time is dictated by temperature and available daylight. My preference leans towards concentrates, which I can brew to taste i.e. a degreaser for a deep component clean, a winter weight grot softener, and one for lighter, generic blow-overs.  


Much the same principle when it comes to lubes, maintenance sprays, and freeing agents. A very thin spray, like GT85GT85 ALL PURPOSE LUBRICANT (sevendaycyclist.com) is great for displacing moisture post wash freeing sticky cables and will even ease a reluctant seatpost. However, immobile, or semi seized stuff requires a penetrant spray. In a pinch, strong solvent-based degreasers/disc brake cleaners can also save the day.  


Technique also plays a part on the efficiency front. Taking stuck seatposts as an example, wrapping an old bubble wrap envelope (cut down) into a cone shape and secure it around the seat tube with a zip tie (having removed the seat bolt).  


Deliver a quick shot directly at the post and tap the saddle with a rubber “engineer’s” mallet. Now deliver subsequent blasts into the envelope, in a circular motion, this will see it travel inside the post steadily. Give the saddle regular firm taps, every few minutes to encourage penetration, break the seal of corrosion and ultimately, free the post. Similar technique for old-fashioned quill stems, too.     


I also keep a stockier maintenance spray for protecting fasteners from corrosion, longer-term lubrication to brake/gear cables, masking electroplated frame/fork ends, keeping locking/mechanisms mobile. Horses for courses, is my point. Talking of which, those seeking a small-wheeled magnesium e-folder might be interested in this MIRider MIRIDER 2021 | cycling-not-racing (sevendaycyclist.com)  


Tuesday 19 March 2019

Rings & Ratios


My Univega’s gearing has always been something of a compromise, since 2017’s new paint and 1X9 makeover. A 34-tooth ring and 11-30 cassette would’ve been too low.
The 44x11-28 gives a range between 103 and 40.5 inches, which is generally practical for road duties, although, I’ve missed the additional torque offered by the 30- tooth sprocket. Especially when climbing a 1 in 7 and battling a headwind. Plenty of the latter, this past fortnight, or so.
Having just replaced the chain and cassette, buying another would’ve been silly, so I turned my attention to the front ring. 94 BCD…Nothing suitable “in stock” but a witching hour wander round the web, unearthed a black 42 tooth Talon for £9.99.  Apparently, these had been purchased from the distributor, in huge quantities and originally retailed at £35 apiece.
I was relieved to discover the old Shimano ring’s mounting hardware released with minimal effort. Moreover, though most patterns are accurate these days, I was pleased by the Talon’s fit. Anti-seize on the crank bolts, snug tight with a long 5mm Allen key-sorted.
Gearing now ranges from 98.3 and 38.6 inches without major jumps (38.6, 45.1,51.5, 60.1,67.6,77.3, 83.2,90.1, 98.3).
Arguably a 40 would’ve been better still, offering a 36.8-inch bottom gear. However, I’m not going to lose any sleep over it and will probably switch to a 11-30 cassette, next time round.
Continuing this theme, I’ve been fortunate enough to receive some lovely Genetic Tibia track cranks (and Tibia 7075 T6 ring). The cranks are JIS (Japanese Industry Standard) rather than ISO. Indeed, to my knowledge, this is comparatively rare. Though not overly problematic in the general sense, its worth noting that ISO tapers are slightly longer than JIS. This means you will need to buy another bottom bracket, to achieve correct chainline.
I was sent the 165mm arms. 5mm shorter than the System EX Track https://www.sevendaycyclist.com/system-ex-crankset , I suspect these were selected because of the road bike designation. My working fixed has a relatively tall bottom bracket, so less problematic (The original build had 175mm arms) but shorter arms provide additional cornering clearance on a conversion. I simply raised the saddle by 5mm to compensate.
Shimano’s UN55 is ideal (read all you need) for these duties. Inexpensive, the sealed cartridge bearings have been known to reach 10,000 miles, before slop sets in. The existing unit is still in rude health.
However, rude, agricultural language followed when I tried to remove the long standing, and very likable System EX. Self Extracting crank bolts are an absolute godsend. Univega and working fixed do not feature these, but their cranks are seldom removed.
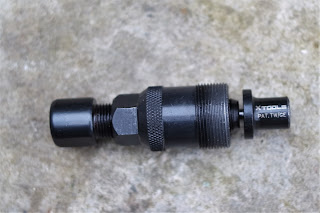
Save for bottom bracket replacement, and periodic re-greasing of the bolts. On this occasion, after 29 years, my Sugino crank extractor finally died. Stripped tool threads meant it couldn’t divorce arms from tapers.
Enter this cheap, but cheerful X tools replacement, which arrived the very next day. Credit where due, it did the job handsomely. Nonetheless, prising those cranks from their tapers, still required copious amounts of penetrant spray, a very long 8mm Allen key and the sort of primal grunting more commonly associated with a labour ward.
Now, I don’t grease tapers but the bolts themselves were given a liberal helping of Park PPL-1. Ditto the reinstated ISSI pedals. The 44 tooth Genetic ring keeps gearing at 78.3 inches.
Taller than text book perhaps but avoids knee trouble, yet tall enough to dodge comical, warp-speed spin out along 1in7s. The new setup weighs 717g (48g heavier than the System EX) but I’m suspecting there will be other, tangible benefits…

Tuesday 4 July 2017

Rub a Dud Hub......Shifting the Seized Sprocket


Well, despite herculean efforts, primal grunting and copious amounts of penetrant spray, the EAI Gold Medal Premium sprocket was right royally stuck.  Thankfully, John was around that morning, so I dashed down, inbred hub in hand. Locked within his vice, the usual, measured force was applied.
Extra long, custom brewed chain whips, hammer and punch shifted the lock-ring. Persuading the sprocket free ultimately lead to intelligently engineered force.
Having established the hub was at the end of its long and useful life, we donned ear defenders and he cuts the opposite flange square with his angle grinder. Flat flanges are easily gripped within the vice jaws, making lock-ring and sprocket extraction that bit easier...In theory. Practice proved a bit more involved...
The former required some blunt persistence, from his hammer and punch. A gentle tinkling as it bounced across the floor announced successful liberation.
Launching the final assault, John grabs his prodigious, home brewed chain whip and wraps it anaconda fashion around my prized, titanium oxide coated stainless steel sprocket. Starting gently, he steadily increases the pressure, working counter clockwise until it eases free-mission complete!
A reminder to strip, inspect and re-grease components regularly, especially those under a lot of force and in the firing line of dodgy water. John was trained by his father to strip his bikes on a monthly basis.
The argument is very persuasive. From a mechanic’s perspective, it enables easy evaluation of component health and any potential problems to be blitzed before bigger problems present.
Team mechanics will perform this at the end of each stage race, given the money and potential losses at stake.  Seasonal strips are arguably the best balance, especially on bikes seeing hard service. When testing really “stiff” greases etc, I may exceed this.
Given the amount of waxy frame preserve sloshing around inside my frames, bottom brackets and seatposts will usually relent with nominal effort-even after 12months or so. Fixed transmissions are low maintenance.
Beyond keeping an eye on tension and drizzling lube on the chain, sprockets are usually forgotten, until replacement, or some other remedial work needs doing.
White Lightning Crystal grease, as used on the Halo hub threads was my default. https://www.sevendaycyclist.com/white-lightning-crystal-grease 
However, I’d managed to misplace the tube in all this excitement. Hence, the new hub threads received a liberal basting of Park PPL1.
Galvanic corrosion (where metals of different parentage seize) is to be avoided, at all costs. Lessons have been re-enforced, so I vow to strip, inspect and replenish every three months. Watch this space... https://www.sevendaycyclist.com/wheel-building-part-one-theory-and-
Otherwise some rim tape and a 30mm tyre later, we are ready for road testing.  John reckons there might be some bedding in and spoke stretch during the formative miles. Frankly, this is to be expected and will necessitate another quick tweak on the jig but nothing out of the ordinary.  A bit like rot around Mk1 KA filler caps...