Friday, 5 July 2019

Ironing out the imperfections


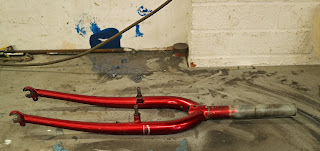
Third time lucky, they say. Bribed with biscuits, Maldon Shot Blasting & Powder Coating https://ctc-powder-coating.co.uk/ kindly slotted in my beloved "ironing board", and the Univega's original forks. 

Ironing board??? Well, that's Carl, their shot blaster's affectionate nickname, for my beloved Bob Yak homage. One I reckon's rather fitting. Anyhow, like most of my refurbs, there were a few surprises along the way. 

First; the forks. These were chased through with industrial alcohol, to remove any frame preserve. Otherwise (this goes for anything oily, especially OIF motorcycle frames) it will turn molten during the curing phases, ruining the new finish and potentially scalding the sprayer. Not cool.  

Graham then whipped them over to the chilled iron grit cabinet. This media, is extremely effective and more durable, than others. However, for flawless results, he gave them a final tidying, using glass bead. Unlike the frame, there wasn't a nickle plated layer, beneath the flamboyant red enamel. https://www.sevendaycyclist.com/after-the-gritters-went-home   

Nonetheless, brazing and TIG work was to the stereotypically clean, uniform Taiwanese standard.  
By contrast, the trailer was submerged in the methyl chloride tank, for twenty minutes. Much as we'd anticipate, the unsealed 2K factory finish began to lift, and was coming away in grey ribbons. This revealed a phosphate rich primer, which I wasn't expecting, given the budget, yet serviceable top coat. 

From here, it went to their main blasting cabinet. One that has echos of Leatherface's cutting room, in Texas Chainsaw Massacre. After performing some remedial surgery on "the pot"; Carl stripped the remaining mulchy mess using cast iron grit. Blasting, regardless of media, provides the lightly dimpled key, for primer and subsequent coats. 

This also reveals the item's true structural integrity. I recommend asking your finisher to give you a call, once they've blasted the frame (or other item). At this point, any remedial works (and their cost implications) can be discussed and, where appropriate, commissioned. 

So, with the fork given its zinc rich, epoxy primer, I had toyed with the idea of having the trailer's swing arm finished in gloss black and the trailer (sorry, ironing board) chrome silver. However, this would be adding mischief to the mix, for no good reason. 

This still received the epoxy base coat, oven cured at 150 degrees, for 15 minutes. The faint tackiness encourages better adhesion, of the colour and clear coats. Chrome silver was then applied, and returned to the curing oven for a further fifteen minutes. 

Graham advised me against touching the colour finish, since this requires an acrylic lacquer. Oils from the skin, however slight, can cause oily patches to bleed through. 
Curiously, there was no call for lacquering the forks, since the gloss black was described as particularly hardy. Besides a small fracture in the clear coat's surface (caused by a quick release "bite mark") could result in blistering and in turn, unsightly peeling.  

Given their attention to detail, and exemplary standards of workmanship, I wasn't remotely surprised (although still delighted) by the impeccable results. Rebuilding took longer than first envisaged. Thankfully I always take photos, of disassembly. 

However, I forgot to take my own advice, when it came to two plastic sleeves. These were hidden deep within the swing arm. More by luck than judgement, I managed to reinstate them correctly, first time. 

Aside from blowing some Green Oil Eco spray lube https://www.sevendaycyclist.com/green-oil-eco-spray-lube inside the chassis, I applied liberal slatherings of Pure Bike Grease https://www.sevendaycyclist.com/pure-bike-grease to the swing arm's plastic bushing cum bearings, which will hopefully protect and lubricate.  

Despite thorough masking, some residual specs of powder can sneak in, thus the hitch assembly required a bit of bedding in, and a shot of Green Oil ECo-Spray lube before they'd connect and release smoothly. 

Bob Elliot & Co LTD https://www.bob-elliot.co.uk/ have sent us some lovely Ravemen and Smart lights, so you'll excuse me. Time to pop them on charge, and go out to play.
Thursday, 27 June 2019

Diversions & Fixations


Due to the sheer demand for Maldon Shot Blasting & Powder Coating's expert services, my trailer and TIG welded forks blast n' paint rebirth, has been postponed. One of those things. I'd never ask anyone to work beyond their capacity. I wouldn't welcome it, so why would anyone else!
For some reason, the Halo Fixed-G https://www.sevendaycyclist.com/halo-fixed sprocket's lock-ring, will not stay tight, subsequently, the sprocket moves along the splines. This would partly account for the annoying, low level chatter when riding across anything other than virgin tarmac.
Then of course, there's the selection of loose fasteners, zip-ties etc residing in the Carradice SQR Tour's side pockets. Lived in patina aside, mine's still looking great, 18 years on and is arguably the best option for my (general riding) needs. Big lock, tools, change of clothes/shoes, tubes, food and tooling- easily swallowed.
The only minor consideration is weight distribution. Laden anywhere close to their ten kilo capacity, the SQR and its Carradry cousin  https://www.sevendaycyclist.com/carradice-carradry    can be something of a handful. That said; it’s a characteristic that I became accustomed to, and accounted for, within a matter of rides.
Back to sprockets...For the time being, I've gone for this 15-tooth, Andel Threaded Cro mo track unit-mounted on the hub's threaded side (obviously). Given these get the lion's share of dodgy water, salt and other detritus, greasing the threads with a suitably stiff grease, is essential. In this instance, I've opted for a ceramic, to avoid galvanic union later on.
I prefer ceramics. Durability and to some extent cleanliness being the main draw. However, a synthetic PTFE fortified prep will be fine, even on Titanium/aluminium interfaces. Old fashioned lithium greases are also fine...Provided you are pairing an aluminium alloy sprocket and hub.
I've also forgone the lock ring- for now. Lock rings are a sensible move. However, I find, even given a liberal greasing, the forces placed upon a fixed transmission, ensures sprockets get wound on very tightly.
Harmonious swoosh restored. I would be interested to try Level Components "bolt on" system, which in theory, should be the most secure going, albeit another demanding dedicated  sprockets.
What I’d expect, from a straight cut, CNC machined example. Bevelled sprockets have their place and tend to be relatively cheap. Hence their popularity on road bikes, converted to fixed. 
Overcast, slightly oppressive humidity has been the climatic theme these past week, or so. Nonetheless, I've managed to get out, and really let my hair down on the Holdsworth. No word from Apeman regarding the sheared A80 casing and mount. For the time being, video falls exclusively to my Tom Tom Bandit, which is beautifully intuitive to use. 
Though slightly quirky, the swoopy Soma Condor drops and Tektro RL520 lever are proving inspired revisions. Revisions offering improved control, both in terms of leverage and braking. The bars shallower drop ensures I can hunker lower than with the pursuit type.
I liked the Highway1 handlebars, too https://www.sevendaycyclist.com/soma-highway-1-handlebars. Another relatively shallow design but one that felt deeper, probably given I was running a TT type lever, at the end. I spend much of my time on "open" roads and relatively quiet lanes. Thus, this voluptuous genre, are a better fit. 
The Tektro RL 520 and Miche dual pivot calliper are a decent marriage, offering lots of controlled bite. Enough power to lift the rear wheel, so not something I'll be looking to upgrade. No call for a rear brake, unless you run a flip-flop (Fixed and freewheel setup) or live in a really mountainous region (at which point, you probably wouldn't be running a fixed, or single speed setup).
Other contemplated revisions, include the Crank Brothers Cobalt 3 seatpost, in favour of this Genetic Syngenic https://www.sevendaycyclist.com/genetic-syngenic-seatpost . While I love the Cobalt3's inline design, svelte profile (250g for 400mm, anyone?) I'm less endeared by the single clamp. One that is fiddly to adjust, and more prone to slippage, compared with other designs. Single bolt, or otherwise.   
Aside from the greater leverage/control, wide bars also open the chest cavity, which assists breathing, and of course efficient climbing. Gearing between 76.1 and 81 inches, is arguably bang on, for most road contexts.
Tall enough for maintaining a steady 20mph, without grinding up the gradients, or spinning out on the descents, like a demented, caffeine-fuelled hamster.  Talking of which, check cleat health regularly. Unplanned disengagement at 25mph plus is a very unwelcome, and potentially painful and expensive experience.  We have become very accustomed to a fantastic system of universal healthcare, here in the UK.
As is to be expected, given its enormity, there are sections of the NHS that would merit improvement, However, the present political administration seems determined to dismantle, in favour of a US-style, insurance-based system.
Combine that with a public happy to share their DNA, in order to "discover their ancestors" and "heritage", it’s not difficult to see how an insurer could test for genetic susceptibility and increase premiums (or indeed, decline insurance for certain conditions). This would also have implications for other things, including mortgages, and related premiums.

Saturday, 22 June 2019

Trailer & Transmission Fettling


Well, I've made time to strip the TW Bents Yak homage trailer, ready for some modifying and makeover magic. Disassembly was remarkably straightforward. Once I 'd worked out how the press fitted bushing/bearings were instated. 

I prefer the single wheel designs, since they track with the bike's movement but all systems have their pros, and indeed cons. https://www.sevendaycyclist.com/tug-jobs 
It was a welcome surprise to discover they'd been treated to some plastic-friendly grease, which assisted their, undamaged extraction. Only modest amounts of controlled force and primal grunting ensued.

Formative discussions with Maldon Shot Blasting & Powder Coating erred toward a chrome effect swing arm, top rail and either a buttermilk (Interpon 610) or  gloss black base/frame. The chrome effect providing some reflective safety, the gloss black timeless, and easy to touch up, as required.  

However, I've since decided that chrome throughout, is the best option.
Keeps things uniform and is arguably the most efficient use of time and other resources.  

Chris was doing some more wet spray work, this time on what appears to be an old De Rosa, and this carbon fork, which will be matt blue, once the lacquer is applied. 

Seems  good quality. mass-produced (26 inch mtb) forks are now rarer than hen's teeth. Given my Univega's design brief, Carbon's a non-starter. A bespoke steel set, was another option. Disc and canti, mudguard and front rack mounts... 

However, while I'm a firm believer in paying skilled people appropriately, there had to be another option. Especially since I was only looking to save a few grams...Lo and behold!  
While rummaging through my spares stash, seeking inspiration, I rediscovered it's original pair. 

The original flamboyant red enamel was showing some cosmetic damage. 

Otherwise, not rot or other nastiness. Crown race liberated, Graham has kindly agreed to blast and refinish them, in gloss black powder coat. Note to self. Mus remind them to soak in methyl chloride tank, as they've been Waxoyled.  Be interesting to see, if  these also sport a nickel plated layer beneath the paint... https://www.sevendaycyclist.com/after-the-gritters-went-home 

Too much Mad Max, at an impressionable age, perhaps but  I have a quiet appreciation of matt black, and indeed other, slightly distressed effects. Nonetheless, gloss and satins rule my roost. 

A curious rattle, experienced when traversing washboard tarmac suggested my fixed gear winter/trainer's chain needed tensioning again. Closer inspection revealed it was the Halo Fix G Track hub's https://www.sevendaycyclist.com/halo-fixed cassette style lockring. I was surprised by just how loose it was. Note to self! Check more frequently! 

Wheel out, tool in, 40nm torque-sorted. Presented the ideal opportunity to instate the threaded side's cover, along with a light lick of grease. Keeps things looking sleek, and sheltered from grot. I also decided to swap to a Sram chain, since I was about it. 

Nothing wrong with the Passport Elements Single Speed Chain https://www.sevendaycyclist.com/passport-elements-single-speed-chai  whatsoever. However, my long term experience suggests it's best for single-speed and hub geared, rather than fixed builds forgoing a rear brake. Especially, if you live/ride in hillier regions.  For many, simplicity is fixed's main draw. 

However, its important to remember the stresses placed upon a fixed setup, doesn't permit sloppy maintenance. For me cheap chain, hubs and sprockets are false economy. I'd still be inclined towards a 1/8th chain- even on 3/32 sprockets.

Despite the persistent, showery conditions I'm still running the Zefal Pro-Dry Chain Lube. Love the low friction, serene swoosh and indeed, its penetrant qualities. It literally seeps into the chain's inner sanctum, which made removing the joining pins, a breeze. 

Not quite so clean-at least compared with long cure, barely there ceramics, including Weldtite TF2 Ultra Dry Chain Wax https://www.sevendaycyclist.com/weldtite-tf2-ultra-dry-chain-wax ; or indeed Rock n' Roll Absolute Dry Chain Lube https://www.sevendaycyclist.com/rock-n-roll-absolute-dry-chain-lubr 

The SRAM does seem a bit meatier, although I'll keep the Passport. According to my digital gauge, it's only a quarter worn, and could still come in handy... Muc-Off sent us some interesting samples of their lubes and polishes, this week. Well, keeps me out of mischief.... 
  

Tuesday, 18 June 2019

Reflections in The Rain


So, the Holdsworth’s returned hibernation due to torrential rains and semi-flooded roads. Gives me chance to acquire a replacement Apeman housing. Talking bars, I reached my verdict on the Velo Orange Handlebar Accessory Mount. https://www.sevendaycyclist.com/velo-orange-handlebar-accessory-mou  
Defaulted to my fixed gear winter/trainer, early season training kit, and wet lube. Mildly temperamental cleat engagement promoted some introspection, and ultimately replacement of the left. I’d had a part-worn spare (in much better shape) bouncing around a small parts tin. Bolted in situ, harmony restored.
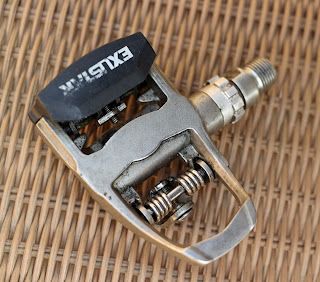
Patterns are generally very accurate. Some will argue this is because many are made in the same factories, and simply re-branded. Maybe so. However, having mixed n’ matched VP, Wellgo, XTC, Exustar, (and pretty much every SPD pattern I could get my feet in, these past 25 years) I’ve concluded Shimano cleats are machined to marginally tighter tolerances.
Placed aside each other, these ISSI cleats have a ledge, whereas the Shimano are flat. Interestingly, the Shimano engage and release faster than the dedicated ISSI (which, in fairness, work harmoniously with the brands discussed).
As with cameras, there’s a sound economic, and practical argument for running one, or two systems. I ran Look on my road bikes, SPD on my mtbs for several years (rather like running wet lubes during winter, dry during summer).
However, the latter system’s convenience- the ability to walk, rather than hobble (and gouging expensive flooring) through the house, or when navigating slippery surfaces etc, saw their wholesale adoption. Holdsworth & Teenage Dream, run Time, SPD for Univega and of course, fixed gear winter/trainer.
I prefer dual sided systems, especially riding fixed, since you can simply clip in, and power away. However, some single-sided designs, including these Wellgo are weighted, which means the pedal “presents” the cleat mechanism, so less faff.
This; coupled with their smaller surface area has proven a winning combo on my tubby tourer.  I’ve also run a set of Time All Road Gripper Pedals, to good effect. They were a hybrid design- cleat mechanism one side, rubberised platform, on the other.
They’ve been gone from the French marque’s range for several years, and pricey for working bikes, relative to dual sided SPD patterns. 
My only minor gripe, with Time’s otherwise brilliant ATAC, is the use of brass cleats. The softer metal wears faster, and replacements are expensive, relative to the ubiquitous SPD.      
Stating the obvious perhaps, but this soggy spell has been perfect, for testing wet lubes (although I also like putting dry formulas against the elements. If only to see how they’ll cope when an arid ride turns unexpectedly soggy). 
Talking of which, despite looking slightly thirsty, touching my fixed’s chain revealed a stoical black, lubricant layer. I’ve since cruised past the 300-mile mark, before this became a faint, filmy state. 
So, since I was adjusting the chain tension… Out came the Zefal Pro Dry Chain Lube. An odd choice some would argue. Afterall, these are specifically designed for tinderbox dry conditions.
However, the UK is, apparently on the cusp of high pressure and blue skies. Is the Pro Dry going to be of the old school, i.e. washed away come the first hint of drizzle? Only real-world miles will tell.  
Several months in, I’m pleased to report that the Velo21 Ultimate Paintwork Protection https://www.sevendaycyclist.com/velo-21 has lived up to its hype. In a nutshell, its compatible with matt, satin and gloss finishes, a little goes a long way, and results are lasting.

Wednesday, 12 June 2019

Finishing Touches & Minor Frustrations


So, having awoken the Holdsworth from its Seasonal slumber, it would be rude not to ride it.  Through the Soma Condor might look a little curious, from certain angles, they and the Tektro R200 are proving a hit with me. Something I wasn’t complexly sure would be the case.
During our maiden blast, I was somewhat perturbed to discover the Apeman A80 Action cam https://www.sevendaycyclist.com/apeman  mount imploding at 23mph. Thankfully, I averted its loss and our mutual collision with terra-firma. Action cam safely stuffed in jersey pocket, I continued to assess the most recent mods, while sporting a massive grin.
Back home, rummaging through a brackets box, I uncovered this K-Edge Go-Pro mount. Thankfully, the Apeman casing was plug n’ play compatible. No all Go Pro homages are. Once upon a time, I only considered action cams a means of capturing the sights n’ sounds of a ride. The past few years have seen me deploy them, to record driver aggression. Unfortunately, the housing fractured, almost
64 years young, those plain gauge 531 tubes still deliver a responsive, and refreshingly compliant ride. Obviously, carbon blades and a titanium stem help in that regard, while keeping the weight down.
The Condor have brought the cockpit a little closer, so I slid the BBB Razer saddle back a few millimetres to offset this. However, I’ll leave it 100 miles before reaching for an Allen key. Unless of course, the post cradle bolt should loosen.  
Elsewhere, I dropped by Maldon Shot Blasting & Powder Coating. Part social, part features cum favour based. Work had begun on the Holdsworth Cyclone frameset. Blasting revealed a pin dent, minor pitting and corrosion. This is not unexpected, given the frame’s age.
Much of this was evident where electroplating and paint overlapped. I fully appreciate why the owner wanted to preserve the original electroplating. However, getting paint to adhere successfully is a challenge. Even the most experienced paint shops struggle.
Acid etch primers were the most successful default, but even they lose tenure eventually.  The colour coats will be water-based, sealed under a polyester (powder coat) lacquer. In common with cellulose paints, water-based paints can be built up to produce a phenomenally deep, glossy sheen.
Hence their adoption by many prestige car manufacturers. These are usually sealed under a 2K lacquer. For durability and adhesion, Chris has treated the cyclone, to a zinc rich epoxy powder coat primer.
With the head tube masked, the wet spray colour coats can commence. These will be topped off with a clear, polyester powder lacquer. Arguably powder coated acrylics offer the best aesthetic but polyester has the edge, where outright durability’s concerned.
Staying with sealants and lacquers a moment, while semi-permanent lacquers, such as Crankalicious Enduro Frame Sealant https://www.sevendaycyclist.com/crankalicious-enduro-frame-sealant-  aren’t designed to defend pricey paintwork from dings, scratches and similar damage, they do offer a useful protectant barrier.
The sort that resists road salt, oily spatter and makes the bike easier to clean. My one lament concerning my Univega’s otherwise excellent cream finish, is its tendency to show every oily finger mark. No matter how thoroughly I wax it. Well, I’m pleased to report sealants have saved the day.
Fenwick’s Professional Protective Coating has proved extremely effective. Compatible with gloss, matt and satin finishes, it’s a water-based formula that you work into clean dry surfaces. Buff to ashine and ideally, leave curing eight hours. This ensures it won’t transfer to hands, or other, unwanted regions of the bike’s anatomy.
Fenwick’s reckon a single application will last up to 6 months. A bit early to comment one way, or the other. Nonetheless, the invisible, slippery layer is more apparent than most and crucially, it seems to be keeping “Ursula” clean, in much the same fashion, a traditional, permanent lacquer would.